Race added to RSC Photo Gallery: 19/10/2018
Last photo update on this page: 19/10/2018
| | | | | | |
| 3 |  |
| Closed bodywork |
| Driven by: Martin Rump (EST)/Frankie Cheng (CHN) | Result: Race 1: 6th (25s233 behind the winner) ; Race 2: 12th (55s321 behind the winner)
Grid: race 1: 5th (1:38.2780), race 2: 17th (1:38.3780) |
| Colours: unknown |
| Tyres: Pirelli |
| Photo updated: 19/10/2018 | Photo by courtesy of: Tooru Kitajima |
| | | | | | |
| 5 |  |
| Closed bodywork |
| Driven by: Shaun Thong (HK)/Alex Yoong (MAL) | Result: Race 1: 7th (26s922 behind the winner) ; Race 2: 10th (48s885 behind the winner)
Grid: race 1: 7th (1:38.4460), race 2: 13th (1:38.0810) |
| Colours: unknown |
| Tyres: Pirelli |
| Photo updated: 19/10/2018 | Photo by courtesy of: Tooru Kitajima |
| | | | | | |
| 7 |  |
| Closed bodywork |
| Driven by: Andrew Kim (ROK)/Adderly Fong (HK) | Result: Race 1: 13th (1m01s653 behind the winner) ; Race 2: 14th (1m08s315 behind the winner)
Grid: race 1: 14th (1:39.0570), race 2: 16th (1:38.3250) |
| Colours: unknown |
| Tyres: Pirelli |
| Photo updated: 19/10/2018 | Photo by courtesy of: Tooru Kitajima |
| | | | | | |
| 8 |  |
| Closed bodywork |
| Driven by: Hiroaki Nagai (J)/Kota Sasaki (J) | Result: Race 1: 22nd (1 lap behind the winner) ; Race 2: 6th (32s216 behind the winner)
Grid: race 1: 10th (1:38.5660), race 2: 7th (1:37.6630) |
| Colours: unknown |
| Tyres: Pirelli |
| Photo updated: 19/10/2018 | Photo by courtesy of: Tooru Kitajima |
| | | | | | |
| 11 |  |
| Closed bodywork |
| Driven by: Brian Lee (RC)/Tony Fong (HK) | Result: Race 1: 25th (4 laps behind the winner) ; Race 2: 27th (4 laps behind the winner)
Grid: race 1: 29th (1:48.3920), race 2: 30th (1:49.4010) |
| Colours: unknown |
| Tyres: Pirelli |
| Photo updated: 19/10/2018 | Photo by courtesy of: Tooru Kitajima |
| | | | | | |
| 12 |  |
| Closed bodywork |
| Driven by: Richard Wee (SGP)/Daniel Au (SGP) | Result: Race 1: did not finish ; Race 2: 31st (4 laps behind the winner)
Grid: race 1: 30th (1:48.9880), race 2: 33rd (no time) |
| Colours: unknown |
| Tyres: Pirelli |
| Photo updated: 19/10/2018 | Photo by courtesy of: Tooru Kitajima |
| | | | | | |
| 17 | 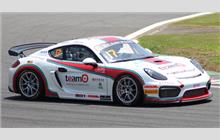 |
| Closed bodywork |
| Driven by: George Chou (RC)/Keo Chang (RC) | Result: Race 1: 26th (4 laps behind the winner) ; Race 2: 29th (4 laps behind the winner)
Grid: race 1: 31st (1:49.3530), race 2: 29th (1:49.2220) |
| Colours: unknown |
| Tyres: Pirelli |
| Photo updated: 19/10/2018 | Photo by courtesy of: Tooru Kitajima |
| | | | | | |
| 18 |  |
| Closed bodywork |
| Driven by: Yukinori Taniguchi (J)/Alexandre Imperatori (CH) | Result: Race 1: winner - (160.100 kph) - margin: 13s041 ; Race 2: 4th (10s819 behind the winner)
Grid: race 1: 6th (1:38.4200), race 2: 1st (1:36.6720) |
| Colours: unknown |
| Tyres: Pirelli |
| Photo updated: 19/10/2018 | Photo by courtesy of: Tooru Kitajima |
| | | | | | |
| 19 | 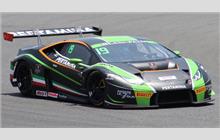 |
| Closed bodywork |
| Driven by: Dennis Lind (DK)/Martin Kodric (HR) | Result: Race 1: 5th (19s478 behind the winner) ; Race 2: 19th (1m31s438 behind the winner)
Grid: race 1: 3rd (1:38.1280), race 2: 9th (1:37.8380) |
| Colours: unknown |
| Tyres: Pirelli |
| Photo updated: 19/10/2018 | Photo by courtesy of: Tooru Kitajima |
| | | | | | |
| 23 |  |
| Closed bodywork |
| Driven by: /Florian Strauss (D)/Edoardo Liberati (I) | Result: Race 1: 3rd (17s502 behind the winner) ; Race 2: 5th (16s886 behind the winner)
Grid: race 1: 1st (1:37.2790), race 2: 6th (1:37.2730) |
| Colours: unknown |
| Tyres: Pirelli |
| Photo updated: 19/10/2018 | Photo by courtesy of: Tooru Kitajima |
| | | | | | |
| 27 | 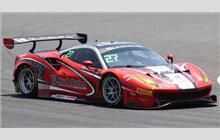 |
| Closed bodywork |
| Driven by: Jono Lester (NZ)/Nicholas Foster (AUS) | Result: Race 1: 2nd 1st in Silver (13s041 behind the winner) ; Race 2: 7th (33s887 behind the winner)
Grid: race 1: 2nd (1:37.8810), race 2: 5th (1:37.1250) |
| Colours: unknown |
| Tyres: Pirelli |
| Photo updated: 19/10/2018 | Photo by courtesy of: Tooru Kitajima |
| | | | | | |
| 28 | 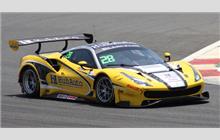 |
| Closed bodywork |
| Driven by: Morris Chen (RC)/Davide Rigon (I) | Result: Race 1: 8th (35s340 behind the winner) ; Race 2: 9th (47s696 behind the winner)
Grid: race 1: 21st (1:40.5950), race 2: 2nd (1:36.6960) |
| Colours: unknown |
| Tyres: Pirelli |
| Photo updated: 19/10/2018 | Photo by courtesy of: Tooru Kitajima |
| | | | | | |
| 33 |  |
| Closed bodywork |
| Driven by: Naoya Yamano (J)/Tetsuya Yamano (J) | Result: Race 1: 9th (43s994 behind the winner) ; Race 2: 15th (1m11s132 behind the winner)
Grid: race 1: 11th (1:38.9500), race 2: 20th (1:38.6610) |
| Colours: unknown |
| Tyres: Pirelli |
| Photo updated: 19/10/2018 | Photo by courtesy of: Tooru Kitajima |
| | | | | | |
| 37 |  |
| Closed bodywork |
| Driven by: Anthony Liu (CHN)/Josh Burdon (AUS) | Result: Race 1: 12th (53s226 behind the winner) ; Race 2: 13th (1m08s139 behind the winner)
Grid: race 1: 12th (1:38.9540), race 2: 11th (1:37.9050) |
| Colours: unknown |
| Tyres: Pirelli |
| Photo updated: 19/10/2018 | Photo by courtesy of: Tooru Kitajima |
| | | | | | |
| 45 |  |
| Closed bodywork |
| Driven by: Naoto Takeda (MAL)/Takuya Shirasaka (J) | Result: Race 1: 18th 1st in Am/Am (1 lap behind the winner) ; Race 2: 21st 1st in Am/Am (1 lap behind the winner)
Grid: race 1: 20th (1:40.2690), race 2: 18th (1:38.5590) |
| Colours: unknown |
| Tyres: Pirelli |
| Photo updated: 19/10/2018 | Photo by courtesy of: Tooru Kitajima |
| | | | | | |
| 47 |  |
| Closed bodywork |
| Driven by: Satoshi Hoshino (J)/Seiji Ara (J) | Result: Race 1: 16th (1m45s627 behind the winner) ; Race 2: 11th (52s284 behind the winner)
Grid: race 1: 16th (1:39.1980), race 2: 15th (1:38.2770) |
| Colours: unknown |
| Tyres: Pirelli |
| Photo updated: 19/10/2018 | Photo by courtesy of: Tooru Kitajima |
| | | | | | |
| 51 |  |
| Closed bodywork |
| Driven by: Andrew MacPherson (AUS)/William Ben Porter (AUS) | Result: Race 1: 19th (1 lap behind the winner) ; Race 2: 23rd (1 lap behind the winner)
Grid: race 1: 26th (1:43.9880), race 2: 24th (1:40.3610) |
| Colours: unknown |
| Tyres: Pirelli |
| Photo updated: 19/10/2018 | Photo by courtesy of: Tooru Kitajima |
| | | | | | |
| 63 |  |
| Closed bodywork |
| Driven by: Hiroshi Hamaguchi (J)/Marco Mapelli (I) | Result: Race 1: did not finish ; Race 2: 3rd (10s338 behind the winner)
Grid: race 1: 8th (1:38.5080), race 2: 4th (1:37.0420) |
| Colours: unknown |
| Tyres: Pirelli |
| Photo updated: 19/10/2018 | Photo by courtesy of: Tooru Kitajima |
| | | | | | |
| 82 |  |
| Closed bodywork |
| Driven by: Ken Urata (J)/Max Chen (RC) | Result: Race 1: 28th (4 laps behind the winner) ; Race 2: 28th (4 laps behind the winner)
Grid: race 1: 28th (1:47.8540), race 2: 28th (1:48.4820) |
| Colours: unknown |
| Tyres: Pirelli |
| Photo updated: 19/10/2018 | Photo by courtesy of: Tooru Kitajima |
| | | | | | |
| 86 |  |
| Closed bodywork |
| Driven by: Mitchell Gilbert (MAL)/Aditya Patel (IND) | Result: Race 1: 10th (45s862 behind the winner) ; Race 2: 16th (1m21s611 behind the winner)
Grid: race 1: 13th (1:39.0410), race 2: 23rd (1:38.8310) |
| Colours: unknown |
| Tyres: Pirelli |
| Photo updated: 19/10/2018 | Photo by courtesy of: Tooru Kitajima |
| | | | | | |
| 97 |  |
| Closed bodywork |
| Driven by: Juwon Seo (ROK)/Roelof Bruins (NL) | Result: Race 1: 11th (52s929 behind the winner) ; Race 2: 20th (1m38s528 behind the winner)
Grid: race 1: 17th (1:39.4350), race 2: 22nd (1:38.6770) |
| Colours: unknown |
| Tyres: Pirelli |
| Photo updated: 19/10/2018 | Photo by courtesy of: Tooru Kitajima |
| | | | | | |
| 98 |  |
| Closed bodywork |
| Driven by: Philip Ma (HK)/Shinichi Takagi (J) | Result: Race 1: 27th (4 laps behind the winner) ; Race 2: 22nd (1 lap behind the winner)
Grid: race 1: 25th (1:42.7140), race 2: 19th (1:38.6250) |
| Colours: unknown |
| Tyres: Pirelli |
| Photo updated: 19/10/2018 | Photo by courtesy of: Tooru Kitajima |
| | | | | | |
| 117 |  |
| Closed bodywork |
| Driven by: Xu Wei (CHN)/Naoki Yokomizo (J) | Result: Race 1: 15th (1m13s573 behind the winner) ; Race 2: 32nd - did not finish
Grid: race 1: 19th (1:39.7310), race 2: 12th (1:38.0540) |
| Colours: unknown |
| Tyres: Pirelli |
| Photo updated: 19/10/2018 | Photo by courtesy of: Tooru Kitajima |
| | | | | | |
| 177 |  |
| Closed bodywork |
| Driven by: Kouichi Okumura (J)/Daisuke Yamawaki (J) | Result: Race 1: 20th (1 lap behind the winner) ; Race 2: 25th (1 lap behind the winner)
Grid: race 1: 23rd (1:42.0660), race 2: 26th (1:40.8480) |
| Colours: unknown |
| Tyres: Pirelli |
| Photo updated: 19/10/2018 | Photo by courtesy of: Tooru Kitajima |
| | | | | | |
| 390 |  |
| Closed bodywork |
| Driven by: Tamotsu Kondo (J)/Ken Seto (J) | Result: Race 1: 21st (1 lap behind the winner) ; Race 2: 24th (1 lap behind the winner)
Grid: race 1: 24th (1:42.3270), race 2: 25th (1:40.8450) |
| Colours: unknown |
| Tyres: Pirelli |
| Photo updated: 19/10/2018 | Photo by courtesy of: Tooru Kitajima |
| | | | | | |
| 777 |  |
| Closed bodywork |
| Driven by: Takeshi Kimura (J)/Kei Cozzolino (J) | Result: Race 1: 30th - did not finish ; Race 2: 18th (1m27s523 behind the winner)
Grid: race 1: 22nd (1:40.8770), race 2: 14th (1:38.2080) |
| Colours: unknown |
| Tyres: Pirelli |
| Photo updated: 19/10/2018 | Photo by courtesy of: Tooru Kitajima |
| | | | | | |
| 888 |  |
| Closed bodywork |
| Driven by: Alexander Mattschull (D)/Raffaele Marciello (I) | Result: Race 1: 17th (1 lap behind the winner) ; Race 2: 2nd 1st in Pro/Am (10s328 behind the winner)
Grid: race 1: 18th (1:39.5630), race 2: 3rd (1:36.8300) |
| Colours: unknown |
| Tyres: Pirelli |
| Photo updated: 19/10/2018 | Photo by courtesy of: Tooru Kitajima |
| | | | | | |
| 911 |  |
| Closed bodywork |
| Driven by: Sandy Stuvik (T)/Shae Davies (AUS) | Result: Race 1: did not finish ; Race 2: 8th (37s134 behind the winner)
Grid: race 1: 4th (1:38.2260), race 2: 10th (1:37.8870) |
| Colours: unknown |
| Tyres: Pirelli |
| Photo updated: 19/10/2018 | Photo by courtesy of: Tooru Kitajima |
| | | | | | |
| 991 |  |
| Closed bodywork |
| Driven by: Aidan Read (AUS)/Darryl O'Young (HK) | Result: Race 1: 14th (1m02s628 behind the winner) ; Race 2: 17th (1m22s021 behind the winner)
Grid: race 1: 15th (1:39.1240), race 2: 21st (1:38.6680) |
| Colours: unknown |
| Tyres: Pirelli |
| Photo updated: 19/10/2018 | Photo by courtesy of: Tooru Kitajima |
| | | | | | |
| 999 |  |
| Closed bodywork |
| Driven by: Nico Bastian (D)/Patric Niederhauser (CH) | Result: Race 1: 4th (17s831 behind the winner) ; Race 2: winner - (159.800 kph) - margin: 10s328
Grid: race 1: 9th (1:38.5380), race 2: 8th (1:37.6730) |
| Colours: unknown |
| Tyres: Pirelli |
| Photo updated: 19/10/2018 | Photo by courtesy of: Tooru Kitajima |
| | | | | | |
| 72 |  |
| Closed bodywork |
| Driven by: Ringo Chong (SGP)/Gilles Vannelet (F) | Result: Race 1: 24th (4 laps behind the winner) ; Race 2: 30th (4 laps behind the winner)
Grid: race 1: 33rd (no time), race 2: 32nd (no time) |
| Colours: unknown |
| Tyres: Pirelli |
| | | | | | |
| 81 | |
| Closed bodywork |
| Driven by: Tomohiko Sunako (J)/Takayuki Kinoshita (J) | Result: Race 1: 23rd 1st in GT4 (3 laps behind the winner) ; Race 2: 26th 1st in GT4 (3 laps behind the winner)
Grid: race 1: 27th (1:47.0570), race 2: 27th (1:46.8700) |
| Colours: unknown |
| Tyres: Pirelli |
| | | | | | |
| 666 | |
| Closed bodywork |
| Driven by: Hwang Doyun (J)/Reinhold Renger (D) | Result: Race 1: 29th (5 laps behind the winner) ; Race 2: 33rd (8 laps behind the winner)
Grid: race 1: 32nd , race 2: 31st |
| Colours: unknown |
| Tyres: Pirelli |
If you have a picture of any car that is missing in the gallery or you might have a better photo, please, do not hesitate to
get in touch with us.
×
RSC website is made possible by displaying online advertisements to our visitors.
Please, turn off or otherwise disable your Ad Blocking software
or
become an RSC Donator and contact us.