Complete Archive of Porsche 917/10 TC (page 2)
| | | | | | |
| Interserie Nürburgring | 7. Internationales ADAC Nürburgring 300 km Rennen | 1.4.1973 |
| 1 |  |
| Open bodywork |
| Driven by: Leo Kinnunen (FIN) | Result: 2nd - Heat 1: 2nd ; Heat 2: 2nd
Grid: 9th (8:14.4000) |
| Colours: white/blue |
| Tyres: Firestone |
| Photo updated: 29/01/2006 | Photo by courtesy of: Paul Kooyman |
| | | | | | |
| Interserie Nürburgring | 7. Internationales ADAC Nürburgring 300 km Rennen | 1.4.1973 |
| 2 |  |
| Open bodywork |
| Driven by: Willi Kauhsen (D) | Result: winner - Heat 1: winner ; Heat 2: winner
Grid: 1st (7:31.5000) |
| Colours: yellow (+red) |
| Tyres: Goodyear |
| Photo updated: 29/01/2006 | Photo by courtesy of: Paul Kooyman |
| | | | | | |
| Interserie Nürburgring | 7. Internationales ADAC Nürburgring 300 km Rennen | 1.4.1973 |
| 6 |  |
| Open bodywork |
| Driven by: Georg Loos (D) | Result: 6th - Heat 1: 6th ; Heat 2: 7th
Grid: 10th |
| Colours: red (+yellow/black) |
| Tyres: Firestone |
| Photo updated: 29/01/2006 | Photo by courtesy of: Paul Kooyman |
| | | | | | |
| Interserie Nürburgring | 7. Internationales ADAC Nürburgring 300 km Rennen | 1.4.1973 |
| 16 |  |
| Open bodywork |
| Driven by: George Follmer (USA) | Result: 17th - did not finish (2: Collision with Bross on warm-up lap) - Heat 1: 8th ; Heat 2: 18th - did not finish (Collision)
Grid: 4th (7:52.1000) |
| Colours: white (+blue/red) |
| Tyres: Goodyear |
| Photo updated: 29/01/2006 | Photo by courtesy of: Paul Kooyman |
| | | | | | |
| Interserie Imola | Coppa Orro di Shell Imola | 1.5.1973 |
| 1 |  |
| Open bodywork |
| Driven by: Leo Kinnunen (FIN) | Result: 2nd - Heat 1: 2nd ; Heat 2: 2nd
Grid: 5th (1:40.6700) |
| Colours: white/blue |
| Tyres: Firestone |
| Photo updated: 27/05/2016 | Photo by courtesy of: Rallye Racing |
| | | | | | |
| Interserie Imola | Coppa Orro di Shell Imola | 1.5.1973 |
| 2 |  |
| Open bodywork |
| Driven by: Willi Kauhsen (D) | Result: winner - Heat 1: winner ; Heat 2: winner
Grid: 2nd (1:37.4700) |
| Colours: yellow |
| Tyres: Goodyear |
| Photo updated: 27/05/2016 | Photo by courtesy of: Rallye Racing |
| | | | | | |
| Interserie Imola | Coppa Orro di Shell Imola | 1.5.1973 |
| 6 |  |
| Open bodywork |
| Driven by: Georg Loos (D) | Result: 3rd - Heat 1: 4th ; Heat 2: 3rd
Grid: 4th (1:38.9200) |
| Colours: red (+yellow/black) |
| Tyres: unknown |
| Photo updated: 27/05/2016 | Photo by courtesy of: Rallye Racing |
| | | | | | |
| Interserie Imola | Coppa Orro di Shell Imola | 1.5.1973 |
| 11 |  |
| Open bodywork |
| Driven by: Charlie Kemp (USA) | Result: 8th - did not finish (2:Clutch) - Heat 1: 5th ; Heat 2: 9th - did not finish (Clutch)
Grid: 8th (1:41.9100) |
| Colours: yellow (+red) |
| Tyres: Goodyear |
| Photo updated: 27/05/2016 | Photo by courtesy of: Rallye Racing |
| | | | | | |
| Interserie Imola | Coppa Orro di Shell Imola | 1.5.1973 |
| 16 |  |
| Open bodywork |
| Driven by: George Follmer (USA) | Result: 11th - did not finish (1:Clutch; 2:Clutch) - Heat 1: did not finish (Clutch) ; Heat 2: did not finish (Clutch)
Grid: 1st (1:34.0800) |
| Colours: white (+blue/red) |
| Tyres: Goodyear |
| Photo updated: 27/05/2016 | Photo by courtesy of: Porsche |
| | | | | | |
| Interserie Silverstone | Martini International Super Sports Silverstone | 20.5.1973 |
| 1 |  |
| Open bodywork |
| Driven by: Leo Kinnunen (FIN) | Result: winner - Heat 1: winner ; Heat 2: 2nd
Grid: 1st (1:19.2000) |
| Colours: white/blue |
| Tyres: Firestone |
| | | | | | |
| Interserie Silverstone | Martini International Super Sports Silverstone | 20.5.1973 |
| 2 |  |
| Open bodywork |
| Driven by: Willi Kauhsen (D) | Result: 2nd - Heat 1: 2nd ; Heat 2: winner
Grid: 2nd (1:19.6000) |
| Colours: yellow (+red) |
| Tyres: Goodyear |
| Photo updated: 15/12/2019 | Photo by courtesy of: Rod Kerry |
| | | | | | |
| Interserie Silverstone | Martini International Super Sports Silverstone | 20.5.1973 |
| 6 | |
| Open bodywork |
| Driven by: Georg Loos (D) | Result: 3rd - Heat 1: 3rd ; Heat 2: 3rd
Grid: 5th (1:23.0000) |
| Colours: red (+yellow) |
| Tyres: unknown |
| | | | | | |
| Interserie Silverstone | Martini International Super Sports Silverstone | 20.5.1973 |
| 16 |  |
| Open bodywork |
| Drivers listed: Charlie Kemp (USA) | Result: did not arrive (Car damaged) |
| Colours: white/red/blue |
| Tyres: unknown |
| | | | | | |
| Can-Am Mosport | Labatt's Blue Trophy in the Can-Am Challenge Race | 10.6.1973 |
| 0 |  |
| Open bodywork |
| Driven by: Jody Scheckter (ZA) | Result: did not finish (Puncture, accident)
Grid: 2nd (1:15.8000) |
| Colours: white (+blue) |
| Tyres: Goodyear |
| Photo updated: 11/03/2003 | Photo by courtesy of: Ron Kielbiski |
| | | | | | |
| Can-Am Mosport | Labatt's Blue Trophy in the Can-Am Challenge Race | 10.6.1973 |
| 4 |  |
| Open bodywork |
| Driven by: Hans Wiedmer (D) | Result: 2nd
Grid: 8th (1:21.5000) |
| Colours: orange/blue |
| Tyres: Goodyear |
| Photo updated: 08/04/2002 | Photo by courtesy of: Ron Kielbiski |
| | | | | | |
| Can-Am Mosport | Labatt's Blue Trophy in the Can-Am Challenge Race | 10.6.1973 |
| 16 |  |
| Open bodywork |
| Driven by: George Follmer (USA) | Result: did not finish (Transmission)
Grid: 3rd (1:15.9000) |
| Colours: white (+blue/red) |
| Tyres: Goodyear |
| Photo updated: 21/10/2020 | Photo by courtesy of: Dan Samoyloff |
| | | | | | |
| Can-Am Mosport | Labatt's Blue Trophy in the Can-Am Challenge Race | 10.6.1973 |
| 23 |  |
| Open bodywork |
| Driven by: Charlie Kemp (USA) | Result: winner
Grid: 4th (1:17.2000) |
| Colours: white (+blue/red) |
| Tyres: Goodyear |
| Photo updated: 21/10/2020 | Photo by courtesy of: Graham L. Smith |
| | | | | | |
| Can-Am Mosport | Labatt's Blue Trophy in the Can-Am Challenge Race | 10.6.1973 |
| 59 |  |
| Open bodywork |
| Driven by: Hurley Haywood (USA) | Result: did not finish (Transmission)
Grid: 5th (1:19.4000) |
| Colours: white (+red/blue) |
| Tyres: Goodyear |
| Photo updated: 11/03/2003 | Photo by courtesy of: Ron Kielbiski |
| | | | | | |
| Interserie Norisring | Interserie 200 Meilen von Nürnberg | 24.6.1973 |
| 1 |  |
| Open bodywork |
| Driven by: Leo Kinnunen (FIN) | Result: winner - Heat 1: winner ; Heat 2: winner
Grid: 2nd |
| Colours: white/blue |
| Tyres: Firestone |
| Photo updated: 29/05/2016 | Photo by courtesy of: Rene Alder |
| | | | | | |
| Interserie Norisring | Interserie 200 Meilen von Nürnberg | 24.6.1973 |
| 2 | |
| Open bodywork |
| Driven by: Willi Kauhsen (D) | Result: 4th - Heat 1: 3rd ; Heat 2: 6th
Grid: 1st |
| Colours: yellow (+red) |
| Tyres: unknown |
| | | | | | |
| Interserie Norisring | Interserie 200 Meilen von Nürnberg | 24.6.1973 |
| 6 |  |
| Open bodywork |
| Driven by: Georg Loos (D) | Result: 2nd - Heat 1: 2nd ; Heat 2: 3rd
Grid: 6th |
| Colours: red (+yellow/black) |
| Tyres: unknown |
| Photo updated: 19/05/2009 | Photo by courtesy of: Harry Maurer |
| | | | | | |
| Can-Am Road Atlanta | Carling Can-Am Road Atlanta | 8.7.1973 |
| 4 |  |
| Open bodywork |
| Driven by: Hans Wiedmer (D) | Result: did not finish (Driver ill) - Heat 1: did not finish (Driver ill) ; Heat 2: did not finish
Grid: 12th (1:21.1060) |
| Colours: orange/blue |
| Tyres: Goodyear |
| Photo updated: 16/02/2012 | Photo by courtesy of: Scott Sperka |
| | | | | | |
| Can-Am Road Atlanta | Carling Can-Am Road Atlanta | 8.7.1973 |
| 16 |  |
| Open bodywork |
| Driven by: George Follmer (USA) | Result: winner - Heat 1: 2nd ; Heat 2: winner
Grid: 2nd (1:14.7250) |
| Colours: white (+blue/red) |
| Tyres: Goodyear |
| Photo updated: 28/12/2007 | Photo by courtesy of: Scott Sperka |
| | | | | | |
| Can-Am Road Atlanta | Carling Can-Am Road Atlanta | 8.7.1973 |
| 23 | |
| Open bodywork |
| Drivers listed: Charlie Kemp (USA) | Result: did not arrive (Car damaged in testing) |
| Colours: white (+blue/red) |
| Tyres: Goodyear |
| | | | | | |
| Can-Am Road Atlanta | Carling Can-Am Road Atlanta | 8.7.1973 |
| 59 |  |
| Open bodywork |
| Driven by: Hurley Haywood (USA) | Result: 5th - Heat 1: 5th ; Heat 2: finished, position unknown
Grid: 4th (1:16.8110) |
| Colours: white (+red/blue) |
| Tyres: unknown |
| Photo updated: 28/12/2007 | Photo by courtesy of: Scott Sperka |
| | | | | | |
| Can-Am Watkins Glen | 6-Hours and The Can-Am | 22.7.1973 |
| 4 |  |
| Open bodywork |
| Driven by: Hans Wiedmer (D) | Result: did not finish (Turbo failure) - Heat 1: 7th ; Heat 2: did not finish
Grid: 9th (1:48.6530) |
| Colours: orange/blue |
| Tyres: Goodyear |
| Photo updated: 18/05/2016 | Photo by courtesy of: Joe Cali |
| | | | | | |
| Can-Am Watkins Glen | 6-Hours and The Can-Am | 22.7.1973 |
| 16 |  |
| Open bodywork |
| Driven by: George Follmer (USA) | Result: did not finish (Turbo failure) - Heat 1: did not finish (Turbocharger) ; Heat 2: did not start
Grid: 2nd (1:39.8910) |
| Colours: white (+blue/red) |
| Tyres: Goodyear |
| Photo updated: 18/05/2016 | Photo by courtesy of: Dave Friedman |
| | | | | | |
| Can-Am Watkins Glen | 6-Hours and The Can-Am | 22.7.1973 |
| 23 |  |
| Open bodywork |
| Driven by: Charlie Kemp (USA) | Result: 4th - Heat 1: 4th ; Heat 2: 4th
Grid: 6th (1:44.8730) |
| Colours: white (+blue/red) |
| Tyres: Goodyear |
| Photo updated: 18/05/2016 | Photo by courtesy of: Dave Friedman |
| | | | | | |
| Can-Am Watkins Glen | 6-Hours and The Can-Am | 22.7.1973 |
| 59 |  |
| Open bodywork |
| Driven by: Hurley Haywood (USA) | Result: did not finish (Differential) - Heat 1: did not finish (Differential)
Grid: 5th (1:44.1600) |
| Colours: white (+red/blue) |
| Tyres: unknown |
| Photo updated: 20/10/2020 | Photo by courtesy of: Glenn Burnett |
| | | | | | |
| Can-Am Mid-Ohio | Eleventh Annual Buckeye Cup | 12.8.1973 |
| 0 | 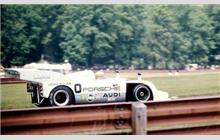 |
| Open bodywork |
| Driven by: Jody Scheckter (ZA) | Result: did not finish (Spun/handling) - Heat 1: did not finish (Spin, handling) ; Heat 2: did not start
Grid: 2nd (1:20.8680) |
| Colours: white (+blue) |
| Tyres: Goodyear |
| Photo updated: 01/09/2003 | Photo by courtesy of: Mark Windecker |
| | | | | | |
| Can-Am Mid-Ohio | Eleventh Annual Buckeye Cup | 12.8.1973 |
| 4 |  |
| Open bodywork |
| Driven by: Hans Wiedmer (D) | Result: did not finish (Brakes, accident) - Heat 1: did not finish (Brakes, accident) ; Heat 2: did not start
Grid: 17th (1:32.0180) |
| Colours: orange/blue |
| Tyres: Goodyear |
| Photo updated: 01/09/2003 | Photo by courtesy of: Mark Windecker |
| | | | | | |
| Can-Am Mid-Ohio | Eleventh Annual Buckeye Cup | 12.8.1973 |
| 16 |  |
| Open bodywork |
| Driven by: George Follmer (USA) | Result: 2nd - Heat 1: 2nd ; Heat 2: 2nd
Grid: 3rd (1:23.7640) |
| Colours: white (+blue/red) |
| Tyres: Goodyear |
| Photo updated: 01/09/2003 | Photo by courtesy of: Mark Windecker |
| | | | | | |
| Can-Am Mid-Ohio | Eleventh Annual Buckeye Cup | 12.8.1973 |
| 23 |  |
| Open bodywork |
| Driven by: Charlie Kemp (USA) | Result: did not start (Differential, accident in practice)
Grid: 6th (1:27.1270) |
| Colours: white (+blue/red) |
| Tyres: unknown |
| Photo updated: 01/09/2003 | Photo by courtesy of: Mark Windecker |
| | | | | | |
| Can-Am Mid-Ohio | Eleventh Annual Buckeye Cup | 12.8.1973 |
| 59 |  |
| Open bodywork |
| Driven by: Hurley Haywood (USA) | Result: 3rd - Heat 1: 4th ; Heat 2: 4th
Grid: 7th (1:27.2020) |
| Colours: white (+red/blue) |
| Tyres: Goodyear |
| Photo updated: 01/09/2003 | Photo by courtesy of: Mark Windecker |
×
RSC website is made possible by displaying online advertisements to our visitors.
Please, turn off or otherwise disable your Ad Blocking software
or
become an RSC Donator and contact us.