Photos of Lola T70 (page 8)
| | | | | | |
| Norisring 200 Miles | 200 Meilen von Nürnberg, Int. ADAC-Norisring-Race-Meeting | 29.6.1969 |
| 1 |  |
| Closed bodywork |
| Driven by: Richard Attwood (GB) | Result: 4th - Heat 1: 7th ; Heat 2: 5th
Grid: 4th (1:20.5000) |
| Colours: green |
| Tyres: unknown |
| Photo updated: 29/08/2017 | Photo by courtesy of: Andrew Judd |
| | | | | | |
| Norisring 200 Miles | 200 Meilen von Nürnberg, Int. ADAC-Norisring-Race-Meeting | 29.6.1969 |
| 2 |  |
| Closed bodywork |
| Driven by: Jo Bonnier (S) | Result: did not finish - Heat 1: winner ; Heat 2: did not finish
Grid: 2nd (1:19.4000) |
| Colours: yellow (+white/red) |
| Tyres: Goodyear |
| Photo updated: 29/08/2017 | Photo by courtesy of: Andrew Judd |
| | | | | | |
| Norisring 200 Miles | 200 Meilen von Nürnberg, Int. ADAC-Norisring-Race-Meeting | 29.6.1969 |
| 3 |  |
| Closed bodywork |
| Driven by: Brian Redman (GB) | Result: winner - Heat 1: 2nd ; Heat 2: winner
Grid: 6th (1:21.3000) |
| Colours: white (+green) |
| Tyres: Goodyear |
| Photo updated: 29/08/2017 | Photo by courtesy of: Andrew Judd |
| | | | | | |
| Norisring 200 Miles | 200 Meilen von Nürnberg, Int. ADAC-Norisring-Race-Meeting | 29.6.1969 |
| 16 |  |
| Closed bodywork |
| Driven by: /Brian Muir (AUS) | Result: did not finish - Heat 1: 10th
Grid: 12th |
| Colours: blue/red (+white) |
| Tyres: unknown |
| Photo updated: 29/08/2017 | Photo by courtesy of: Andrew Judd |
| | | | | | |
| Wills Trophy Croft | W. D. & H. O. Wills International Trophy Race For Group 4 Sports Cars at Croft | 13.7.1969 |
| 4 | 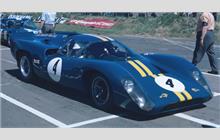 |
| Closed bodywork |
| Driven by: Digby Martland (GB) | Result: 14th - did not finish (1:Overheating) - Heat 1: did not finish (Overheating) ; Heat 2: 3rd
Grid: 4th (1:10.8000) |
| Colours: blue (+yellow) |
| Tyres: unknown |
| Photo updated: 18/12/2010 | Photo by courtesy of: Michel Boixiere |
| | | | | | |
| Can-Am Watkins Glen | Six-Hours and Can-Am | 13.7.1969 |
| 19 |  |
| Closed bodywork |
| Driven by: Jo Bonnier (S) | Result: 7th
Grid: 9th (1:08.0800) |
| Colours: red (+white) |
| Tyres: Goodyear |
| Photo updated: 10/12/2002 | Photo by courtesy of: Dave Kutz |
| | | | | | |
| Granja do Marquês 3 Hours | IV Circuito da Granja do Marquês | 20.7.1969 |
| 86 |  |
| Open bodywork |
| Driven by: Max Wilson (GB) | Result: started, result unknown
Grid: 3rd (1:47.2300) |
| Colours: dark green (+orange) |
| Tyres: unknown |
| Photo updated: 17/12/2023 | Photo by courtesy of: Gérard Boulin |
| | | | | | |
| Can-Am Edmonton | Klondike 200 Edmonton | 27.7.1969 |
| 68 |  |
| Open bodywork |
| Driven by: Ron Grable (USA) | Result: did not finish (Blown clutch)
Grid: 9th (1:33.4000) |
| Colours: orange (+white/silver) |
| Tyres: Goodyear |
| Photo updated: 01/04/2023 | Photo by courtesy of: Kevin Skinner |
| | | | | | |
| Gold Cup Oulton Park | Daily Express International Gold Cup Race Meeting Oulton Park | 16.8.1969 |
| 41 |  |
| Closed bodywork |
| Driven by: Frank Gardner (AUS) | Result: winner
Grid: 2nd (1:33.4000) |
| Colours: light green |
| Tyres: unknown |
| Photo updated: 07/03/2015 | Photo by courtesy of: Randal Warner |
| | | | | | |
| Can-Am Road America | Road America Can-Am Championship | 31.8.1969 |
| 79 |  |
| Open bodywork |
| Driven by: Tom Dutton (USA) | Result: did not finish (Fuel starvation)
Grid: 22nd (2:24.3000) |
| Colours: yellow |
| Tyres: unknown |
| Photo updated: 18/03/2023 | Photo by courtesy of: Paul Thompson |
| | | | | | |
| Can-Am Road America | Road America Can-Am Championship | 31.8.1969 |
| 91 |  |
| Open bodywork |
| Driven by: Doug Hooper (USA) | Result: did not finish (Overheating)
Grid: 33rd (2:29.7000) |
| Colours: blue |
| Tyres: unknown |
| Photo updated: 18/03/2023 | Photo by courtesy of: Paul Thompson |
| | | | | | |
| Can-Am Bridgehampton | Inver House Can-Am Bridgehapmton | 14.9.1969 |
| 24 |  |
| Open bodywork |
| Driven by: Bob Nagel (USA) | Result: did not finish (Water pump belt)
Grid: 20th (no time) |
| Colours: white (+dark blue) |
| Tyres: Goodyear |
| Photo updated: 10/08/2018 | Photo by courtesy of: Jeffrey B. Payne |
| | | | | | |
| Can-Am Michigan | Michigan International Can-Am | 28.9.1969 |
| 24 |  |
| Open bodywork |
| Driven by: Bob Nagel (USA) | Result: did not finish (Broken intake manifold)
Grid: 16th (1:48.8000) |
| Colours: blue |
| Tyres: Goodyear |
| Photo updated: 13/02/2011 | Photo by courtesy of: Gerald Melton |
| | | | | | |
| Can-Am Michigan | Michigan International Can-Am | 28.9.1969 |
| 34 |  |
| Open bodywork |
| Driven by: George Drolsom (USA) | Result: did not finish (Broken front suspension)
Grid: 20th (1:51.0000) |
| Colours: unknown |
| Tyres: unknown |
| Photo updated: 13/02/2011 | Photo by courtesy of: Gerald Melton |
| | | | | | |
| Can-Am Michigan | Michigan International Can-Am | 28.9.1969 |
| 97 |  |
| Open bodywork |
| Driven by: Ron Goldleaf (USA) | Result: did not finish (Handling)
Grid: 26th (no time) |
| Colours: unknown |
| Tyres: unknown |
| Photo updated: 13/02/2011 | Photo by courtesy of: Gerald Melton |
×
RSC website is made possible by displaying online advertisements to our visitors.
Please, turn off or otherwise disable your Ad Blocking software
or
become an RSC Donator and contact us.