Race added to RSC Photo Gallery: 29/01/2006
Last photo update on this page: 18/03/2023
| | | | | | |
| 0 |  |
| Open bodywork |
| Driven by: Jo Siffert (CH) | Result: did not finish (Blown engine)
Grid: 8th (2:13.2000) |
| Colours: white (+blue) |
| Tyres: Goodyear |
| Photo updated: 18/03/2023 | Photo by courtesy of: Paul Thompson and Larry Fullhorst |
| | | | | | |
| 4 |  |
| Open bodywork |
| Driven by: Bruce McLaren (NZ) | Result: winner - (172.956 kph) - margin: 0s1000
Grid: 2nd (2:07.4000) |
| Colours: orange (+silver) |
| Tyres: Goodyear |
| Photo updated: 18/03/2023 | Photo by courtesy of: Paul Thompson and Larry Fullhorst |
| | | | | | |
| 5 |  |
| Open bodywork |
| Driven by: Denny Hulme (NZ) | Result: 2nd (0s1000 behind the winner)
Grid: 1st (2:06.3000) |
| Colours: orange (+silver) |
| Tyres: Goodyear |
| Photo updated: 18/03/2023 | Photo by courtesy of: Paul Thompson and Larry Fullhorst |
| | | | | | |
| 7 |  |
| Open bodywork |
| Driven by: John Surtees (GB) | Result: did not finish (Puncture, suspension)
Grid: 10th (2:15.6000) |
| Colours: white (+silver) |
| Tyres: Firestone |
| Photo updated: 18/03/2023 | Photo by courtesy of: Paul Thompson and Larry Fullhorst |
| | | | | | |
| 9 |  |
| Open bodywork |
| Driven by: Tony Dean (GB) | Result: 5th (3 laps behind the winner)
Grid: 14th (2:20.1000) |
| Colours: white/blue |
| Tyres: Firestone |
| Photo updated: 18/03/2023 | Photo by courtesy of: Paul Thompson and Larry Fullhorst |
| | | | | | |
| 14 |  |
| Open bodywork |
| Driven by: Duane Williamson (USA) | Result: did not finish (Accident)
Grid: 25th (2:25.5000) |
| Colours: unknown |
| Tyres: Goodyear |
| Photo updated: 10/01/2011 | Photo by courtesy of: Larry Fullhorst |
| | | | | | |
| 15 |  |
| Open bodywork |
| Driven by: George Follmer (USA) | Result: did not finish (Transmission)
Grid: 9th (2:13.7000) |
| Colours: white |
| Tyres: Goodyear |
| Photo updated: 18/03/2023 | Photo by courtesy of: Paul Thompson |
| | | | | | |
| 16 |  |
| Open bodywork |
| Driven by: Chris Amon (NZ) | Result: did not finish (Fuel pump)
Grid: 7th (2:13.0000) |
| Colours: red (+silver) |
| Tyres: Firestone |
| Photo updated: 18/03/2023 | Photo by courtesy of: Paul Thompson and Larry Fullhorst |
| | | | | | |
| 18 |  |
| Open bodywork |
| Driven by: Kris Harrison (CDN) | Result: 10th (6 laps behind the winner)
Grid: 34th (2:35.0000) |
| Colours: unknown |
| Tyres: Firestone |
| Photo updated: 10/01/2011 | Photo by courtesy of: Larry Fullhorst |
| | | | | | |
| 23 |  |
| Open bodywork |
| Driven by: Harvey Lasiter (USA) | Result: did not finish (Out of fuel)
Grid: 30th (2:27.9000) |
| Colours: unknown |
| Tyres: unknown |
| Photo updated: 10/01/2011 | Photo by courtesy of: Larry Fullhorst |
| | | | | | |
| 28 |  |
| Open bodywork |
| Driven by: Dick Brown (USA) | Result: 7th (3 laps behind the winner)
Grid: 18th (2:21.1000) |
| Colours: dark green |
| Tyres: Goodyear |
| Photo updated: 18/03/2023 | Photo by courtesy of: Paul Thompson |
| | | | | | |
| 49 |  |
| Open bodywork |
| Driven by: Fred Baker (USA) | Result: did not finish (Blown engine)
Grid: 27th (2:26.2000) |
| Colours: dark blue |
| Tyres: Goodyear |
| Photo updated: 18/03/2023 | Photo by courtesy of: Paul Thompson |
| | | | | | |
| 54 |  |
| Open bodywork |
| Driven by: Oscar Koveleski (USA) | Result: 8th (3 laps behind the winner)
Grid: 21st (2:22.9000) |
| Colours: red (+white) |
| Tyres: Goodyear |
| Photo updated: 18/03/2023 | Photo by courtesy of: Paul Thompson |
| | | | | | |
| 75 |  |
| Open bodywork |
| Driven by: Bob Dini (USA) | Result: did not finish (Clutch)
Grid: 15th (2:20.4000) |
| Colours: blue |
| Tyres: unknown |
| Photo updated: 18/03/2023 | Photo by courtesy of: Paul Thompson |
| | | | | | |
| 79 |  |
| Open bodywork |
| Driven by: Tom Dutton (USA) | Result: did not finish (Fuel starvation)
Grid: 22nd (2:24.3000) |
| Colours: yellow |
| Tyres: unknown |
| Photo updated: 18/03/2023 | Photo by courtesy of: Paul Thompson |
| | | | | | |
| 81 |  |
| Open bodywork |
| Driven by: Spencer Stoddard (USA) | Result: did not finish (Mechanical)
Grid: 31st (2:28.0000) |
| Colours: red |
| Tyres: unknown |
| Photo updated: 18/03/2023 | Photo by courtesy of: Paul Thompson |
| | | | | | |
| 91 |  |
| Open bodywork |
| Driven by: Doug Hooper (USA) | Result: did not finish (Overheating)
Grid: 33rd (2:29.7000) |
| Colours: blue |
| Tyres: unknown |
| Photo updated: 18/03/2023 | Photo by courtesy of: Paul Thompson |
| | | | | | |
| 98 |  |
| Open bodywork |
| Driven by: George Eaton (CDN) | Result: did not finish (Oil pressure)
Grid: 6th (2:12.3000) |
| Colours: red |
| Tyres: Firestone |
| Photo updated: 10/01/2011 | Photo by courtesy of: Larry Fullhorst |
| | | | | | |
| 99 | 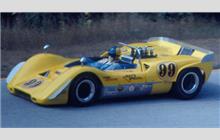 |
| Open bodywork |
| Driven by: David Hobbs (GB) | Result: did not finish (Overheating)
Grid: 13th (2:19.2000) |
| Colours: yellow (+silver) |
| Tyres: Firestone |
| Photo updated: 18/03/2023 | Photo by courtesy of: Paul Thompson and Larry Fullhorst |
| | | | | | |
| 19 |  |
| Open bodywork |
| Driven by: Gary Wilson (USA) | Result: did not finish (Gearbox)
Grid: 12th (2:19.0000) |
| Colours: unknown |
| Tyres: unknown |
| | | | | | |
| 24 | |
| Open bodywork |
| Driven by: Bob Nagel (USA) | Result: did not finish (Gearbox)
Grid: 17th (2:21.0000) |
| Colours: unknown |
| Tyres: unknown |
| | | | | | |
| 27 | |
| Open bodywork |
| Driven by: Richard Galloway (USA) | Result: did not finish (Broken rocker arm)
Grid: 26th (2:25.8000) |
| Colours: unknown |
| Tyres: unknown |
| | | | | | |
| 34 | |
| Open bodywork |
| Driven by: George Drolsom (USA) | Result: did not finish (Gear linkage)
Grid: 29th (2:27.8000) |
| Colours: unknown |
| Tyres: unknown |
| | | | | | |
| 37 | |
| Open bodywork |
| Driven by: Clif Apel (USA) | Result: 11th (7 laps behind the winner)
Grid: 32nd (2:28.0000) |
| Colours: unknown |
| Tyres: unknown |
| | | | | | |
| 43 | |
| Open bodywork |
| Driven by: Brooke Doran (USA) | Result: 9th (4 laps behind the winner)
Grid: 16th (2:20.9000) |
| Colours: red (+yellow) |
| Tyres: Goodyear |
| | | | | | |
| 51 | |
| Open bodywork |
| Driven by: Dave Causey (USA) | Result: 12th (8 laps behind the winner)
Grid: 20th (2:22.0000) |
| Colours: unknown |
| Tyres: unknown |
| | | | | | |
| 64 | |
| Open bodywork |
| Driven by: Chuck Frederick (USA) | Result: did not finish (Broken axle)
Grid: 28th (2:27.7000) |
| Colours: unknown |
| Tyres: unknown |
| | | | | | |
| 71 | |
| Open bodywork |
| Driven by: Stan Burnett (USA) | Result: did not finish (Accident)
Grid: 19th (2:21.8000) |
| Colours: unknown |
| Tyres: unknown |
| | | | | | |
| 77 | |
| Open bodywork |
| Driven by: Leonard Janke (USA) | Result: did not finish (Broken suspension)
Grid: 23rd (2:25.0000) |
| Colours: unknown |
| Tyres: unknown |
| | | | | | |
| 97 | |
| Open bodywork |
| Driven by: Dick Kantrud (USA) | Result: 13th (12 laps behind the winner)
Grid: 24th (2:25.4000) |
| Colours: unknown |
| Tyres: unknown |
If you have a picture of any car that is missing in the gallery or you might have a better photo, please, do not hesitate to
get in touch with us.
More photos from this race:
×
RSC website is made possible by displaying online advertisements to our visitors.
Please, turn off or otherwise disable your Ad Blocking software
or
become an RSC Donator and contact us.