Complete Archive of Mclaren (page 58)
| | | | | | |
| GP Monaco | Grand Prix de Monaco | 3.6.1973 |
| 7T |  |
| Open wheel car |
| Driven by: Denny Hulme (NZ) | Result: practiced only (Spare car)
Grid: T-car |
| Colours: unknown |
| Tyres: Goodyear |
| | | | | | |
| Rose Cup Portland | The 13th Annual Rose Cup Races Portland | 10.6.1973 |
| 3 |  |
| Open bodywork |
| Drivers listed: Bill Cuddy (USA) | Result: did not arrive (Not known if ran) |
| Colours: yellow |
| Tyres: unknown |
| | | | | | |
| Can-Am Mosport | Labatt's Blue Trophy in the Can-Am Challenge Race | 10.6.1973 |
| 9 |  |
| Open bodywork |
| Driven by: John Cordts (CDN) | Result: 9th - did not finish (Out of fuel)
Grid: 6th (1:19.7000) |
| Colours: yellow (+blue) |
| Tyres: unknown |
| Photo updated: 02/10/2004 | Photo by courtesy of: Alan Fassbender |
| | | | | | |
| Can-Am Mosport | Labatt's Blue Trophy in the Can-Am Challenge Race | 10.6.1973 |
| 13 |  |
| Open bodywork |
| Driven by: Warren Agor (USA) | Result: did not finish (Seized oil pump)
Grid: 12th (1:23.6000) |
| Colours: white (+orange) |
| Tyres: Goodyear |
| Photo updated: 11/03/2003 | Photo by courtesy of: Ron Kielbiski |
| | | | | | |
| Can-Am Mosport | Labatt's Blue Trophy in the Can-Am Challenge Race | 10.6.1973 |
| 15 |  |
| Open bodywork |
| Driven by: William Wonder (USA) | Result: 11th
Grid: 18th (1:30.0000) |
| Colours: maroon (+silver) |
| Tyres: Goodyear |
| Photo updated: 11/03/2003 | Photo by courtesy of: Ron Kielbiski |
| | | | | | |
| Can-Am Mosport | Labatt's Blue Trophy in the Can-Am Challenge Race | 10.6.1973 |
| 19 |  |
| - |
| Drivers listed: Gary Wilson (USA) | Result: did not arrive |
| Colours: unknown |
| Tyres: unknown |
| | | | | | |
| Can-Am Mosport | Labatt's Blue Trophy in the Can-Am Challenge Race | 10.6.1973 |
| 30 |  |
| Open bodywork |
| Driven by: Frank Kahlich (USA) | Result: did not start (Accident in practice)
Grid: |
| Colours: white/green |
| Tyres: Goodyear |
| Photo updated: 21/10/2020 | Photo by courtesy of: Dan Samoyloff |
| | | | | | |
| Can-Am Mosport | Labatt's Blue Trophy in the Can-Am Challenge Race | 10.6.1973 |
| 34 |  |
| Open bodywork |
| Driven by: Tom Dutton (USA) | Result: 12th
Grid: 16th (1:24.6000) |
| Colours: white (+red) |
| Tyres: Firestone |
| Photo updated: 09/12/2002 | Photo by courtesy of: Bob Alspaugh |
| | | | | | |
| Can-Am Mosport | Labatt's Blue Trophy in the Can-Am Challenge Race | 10.6.1973 |
| 41 |  |
| Open bodywork |
| Driven by: Jim Butcher (USA) | Result: did not finish (Handling)
Grid: 20th (1:30.9000) |
| Colours: light blue |
| Tyres: Goodyear |
| Photo updated: 22/02/2010 | Photo by courtesy of: Jim Butcher |
| | | | | | |
| Can-Am Mosport | Labatt's Blue Trophy in the Can-Am Challenge Race | 10.6.1973 |
| 47 |  |
| Open bodywork |
| Driven by: Ed Felter (USA) | Result: 8th
Grid: 13th (1:23.8000) |
| Colours: blue/red/white (+gold) |
| Tyres: Goodyear |
| Photo updated: 21/10/2020 | Photo by courtesy of: Dan Samoyloff |
| | | | | | |
| Can-Am Mosport | Labatt's Blue Trophy in the Can-Am Challenge Race | 10.6.1973 |
| 73 |  |
| Open bodywork |
| Driven by: David Hobbs (GB) | Result: did not start (Accident in practice)
Grid: (no time) |
| Colours: black (+red) |
| Tyres: Goodyear |
| Photo updated: 08/04/2002 | Photo by courtesy of: Ron Kielbiski |
| | | | | | |
| Can-Am Mosport | Labatt's Blue Trophy in the Can-Am Challenge Race | 10.6.1973 |
| 96 | |
| Open bodywork |
| Drivers listed: Mario Andretti (USA) | Result: did not arrive |
| Colours: white (+black/brown) |
| Tyres: Firestone |
| | | | | | |
| Can-Am Mosport | Labatt's Blue Trophy in the Can-Am Challenge Race | 10.6.1973 |
| 97 | |
| Open bodywork |
| Drivers listed: Danny Hopkins (USA) | Result: did not arrive |
| Colours: unknown |
| Tyres: unknown |
| | | | | | |
| Can-Am Mosport | Labatt's Blue Trophy in the Can-Am Challenge Race | 10.6.1973 |
| 98 | |
| Open bodywork |
| Drivers listed: Fred Corbett (USA) | Result: did not arrive |
| Colours: unknown |
| Tyres: unknown |
| | | | | | |
| GP Sweden | Hitachi Grand Prix of Sweden | 17.6.1973 |
| 7 | |
| Open wheel car |
| Driven by: Denny Hulme (NZ) | Result: winner
Grid: 6th (1:24.6250) |
| Colours: unknown |
| Tyres: Goodyear |
| | | | | | |
| GP Sweden | Hitachi Grand Prix of Sweden | 17.6.1973 |
| 7T | |
| Open wheel car |
| Driven by: Denny Hulme (NZ) | Result: practiced only (Spare car)
Grid: T-car |
| Colours: unknown |
| Tyres: unknown |
| | | | | | |
| GP Sweden | Hitachi Grand Prix of Sweden | 17.6.1973 |
| 8 | |
| Open wheel car |
| Driven by: Peter Revson (USA) | Result: 7th
Grid: 7th (1:24.9370) |
| Colours: unknown |
| Tyres: Goodyear |
| | | | | | |
| Interserie Norisring | Interserie 200 Meilen von Nürnberg | 24.6.1973 |
| 3 |  |
| Open bodywork |
| Driven by: /Helmut Kelleners (D) | Result: 18th - did not finish (Engine) - Heat 1: 18th - did not finish (Engine) ; Heat 2: did not finish
Grid: 3rd |
| Colours: orange (+dark blue/black) |
| Tyres: unknown |
| Photo updated: 29/05/2016 | Photo by courtesy of: Vogt |
| | | | | | |
| Interserie Norisring | Interserie 200 Meilen von Nürnberg | 24.6.1973 |
| 7 |  |
| Open bodywork |
| Driven by: Michel Weber (D) | Result: 12th - did not finish (2:DNF) - Heat 1: 4th ; Heat 2: did not finish
Grid: 4th |
| Colours: light blue/dark blue |
| Tyres: Firestone |
| Photo updated: 19/05/2009 | Photo by courtesy of: Harry Maurer |
| | | | | | |
| Interserie Norisring | Interserie 200 Meilen von Nürnberg | 24.6.1973 |
| 15 | |
| - |
| Result: did not arrive - Heat 1: did not arrive ; Heat 2: did not arrive |
| Colours: unknown |
| Tyres: unknown |
| | | | | | |
| Interserie Norisring | Interserie 200 Meilen von Nürnberg | 24.6.1973 |
| 17 |  |
| Open bodywork |
| Driven by: Kaye Griffiths (GB) | Result: 8th - Heat 1: 9th ; Heat 2: 9th
Grid: 10th |
| Colours: orange |
| Tyres: unknown |
| Photo updated: 29/05/2016 | Photo by courtesy of: Karl Munzer |
| | | | | | |
| Interserie Norisring | Interserie 200 Meilen von Nürnberg | 24.6.1973 |
| 25 |  |
| Open bodywork |
| Driven by: Teddy Pilette (B) | Result: 13th - did not finish - Heat 1: 16th ; Heat 2: 7th
Grid: 8th |
| Colours: red |
| Tyres: unknown |
| Photo updated: 29/05/2016 | Photo by courtesy of: Rallye Racing |
| | | | | | |
| Interserie Norisring | Interserie 200 Meilen von Nürnberg | 24.6.1973 |
| 30 | |
| Open bodywork |
| Drivers listed: Rolf Götz (D) | Result: did not arrive - Heat 1: did not arrive ; Heat 2: did not arrive |
| Colours: unknown |
| Tyres: unknown |
| | | | | | |
| GP France | Championat du Monde, Grand Prix de France de Formule 1 | 1.7.1973 |
| 7 |  |
| Open wheel car |
| Driven by: Denny Hulme (NZ) | Result: 8th
Grid: 6th (1:49.6800) - 7th fastest qualifier |
| Colours: white (+orange/gold/tan/black) |
| Tyres: Goodyear |
| Photo updated: 27/09/2019 | Photo by courtesy of: H-J Roegler and Rallye Racing |
| | | | | | |
| GP France | Championat du Monde, Grand Prix de France de Formule 1 | 1.7.1973 |
| 7T |  |
| Open wheel car |
| Driven by: Denny Hulme (NZ)/Jody Scheckter (ZA) | Result: practiced only (Spare car)
Grid: T-car (1:49.6500) (6 fastest qualifier) |
| Colours: unknown |
| Tyres: Goodyear |
| Photo updated: 27/09/2019 | Photo by courtesy of: H-J Roegler |
| | | | | | |
| GP France | Championat du Monde, Grand Prix de France de Formule 1 | 1.7.1973 |
| 8 |  |
| Open wheel car |
| Driven by: Jody Scheckter (ZA) | Result: did not finish (Collision)
Grid: 2nd (1:49.1800) |
| Colours: white (+orange/gold/tan/black) |
| Tyres: Goodyear |
| Photo updated: 23/12/2016 | Photo by courtesy of: Rallye Racing |
| | | | | | |
| Can-Am Road Atlanta | Carling Can-Am Road Atlanta | 8.7.1973 |
| 8 |  |
| Open bodywork |
| Driven by: Scooter Patrick (USA) | Result: did not finish (1:Accident) - Heat 1: did not finish (Accident) ; Heat 2: did not start
Grid: 8th (1:17.7390) |
| Colours: blue |
| Tyres: unknown |
| Photo updated: 16/02/2012 | Photo by courtesy of: Scott Sperka |
| | | | | | |
| Can-Am Road Atlanta | Carling Can-Am Road Atlanta | 8.7.1973 |
| 9 |  |
| Open bodywork |
| Driven by: John Cordts (CDN) | Result: 12th - did not finish (1:Overheating; 2:Out of fuel) - Heat 1: did not finish (Overheating) ; Heat 2: did not finish (Out of fuel)
Grid: 18th (1:24.1860) |
| Colours: yellow |
| Tyres: unknown |
| Photo updated: 28/12/2007 | Photo by courtesy of: Scott Sperka |
| | | | | | |
| Can-Am Road Atlanta | Carling Can-Am Road Atlanta | 8.7.1973 |
| 47 |  |
| Open bodywork |
| Driven by: Ed Felter (USA) | Result: 10th - did not finish (Off course) - Heat 1: 10th ; Heat 2: finished, position unknown
Grid: 17th (1:23.5070) |
| Colours: blue/red/white |
| Tyres: unknown |
| Photo updated: 05/02/2018 | Photo by courtesy of: Philip Monk |
| | | | | | |
| Can-Am Road Atlanta | Carling Can-Am Road Atlanta | 8.7.1973 |
| 51 |  |
| Open bodywork |
| Driven by: Pete Sherman (USA) | Result: 9th - Heat 1: 13th ; Heat 2: finished, position unknown
Grid: 20th (1:28.3490) |
| Colours: red/white |
| Tyres: unknown |
| Photo updated: 28/12/2007 | Photo by courtesy of: Scott Sperka |
| | | | | | |
| Can-Am Road Atlanta | Carling Can-Am Road Atlanta | 8.7.1973 |
| 73 | 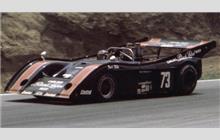 |
| Open bodywork |
| Driven by: David Hobbs (GB) | Result: 4th - Heat 1: 4th ; Heat 2: finished, position unknown
Grid: 7th (1:17.2070) |
| Colours: black (+red) |
| Tyres: Goodyear |
| Photo updated: 28/12/2007 | Photo by courtesy of: Scott Sperka |
| | | | | | |
| Can-Am Road Atlanta | Carling Can-Am Road Atlanta | 8.7.1973 |
| 98 |  |
| Open bodywork |
| Driven by: Danny Hopkins (USA) | Result: 13th - did not finish (Spun) - Heat 1: 9th ; Heat 2: did not finish (Spun)
Grid: 14th (1:22.1060) |
| Colours: white |
| Tyres: unknown |
| Photo updated: 28/12/2007 | Photo by courtesy of: Scott Sperka |
×
RSC website is made possible by displaying online advertisements to our visitors.
Please, turn off or otherwise disable your Ad Blocking software
or
become an RSC Donator and contact us.