Photos of McLaren M8D
| Page 1 of 2 (49 items) | << | < | 1 | 2 | > | >> |
| | | | | | |
| Can-Am Mosport | Can-Am Challenge Race for the Labatt's Blue Trophy and $75.000 | 14.6.1970 |
| 48 |  |
| Open bodywork |
| Driven by: Dan Gurney (USA) | Result: winner
Grid: 1st (1:16.8000) |
| Colours: orange (+blue) |
| Tyres: Goodyear |
| Photo updated: 05/07/2013 | Photo by courtesy of: Rallye Racing |
| | | | | | |
| Can-Am Watkins Glen | Six-Hours and The Can-Am, The Glen | 12.7.1970 |
| 48 | 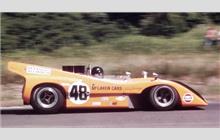 |
| Open bodywork |
| Driven by: Dan Gurney (USA) | Result: 9th
Grid: 2nd (1:03.2200) |
| Colours: orange (+blue) |
| Tyres: Goodyear |
| Photo updated: 04/11/2002 | Photo by courtesy of: Bill Kutz |
| | | | | | |
| Can-Am Edmonton | Klondike 200 Can-Am For The Molson Gold Brick Edmonton | 26.7.1970 |
| 5 |  |
| Open bodywork |
| Driven by: Denny Hulme (NZ) | Result: winner
Grid: 1st (1:23.6000) |
| Colours: orange (+blue) |
| Tyres: Goodyear |
| Photo updated: 02/04/2023 | Photo by courtesy of: Kevin Skinner |
| | | | | | |
| Can-Am Mid-Ohio | Canadian American Challenge Cup Mid-Ohio | 23.8.1970 |
| 5 |  |
| Open bodywork |
| Driven by: Denny Hulme (NZ) | Result: winner
Grid: 1st (1:27.6000) |
| Colours: orange (+blue) |
| Tyres: Goodyear |
| Photo updated: 19/10/2020 | Photo by courtesy of: Brian McMahon |
| | | | | | |
| Can-Am Mid-Ohio | Canadian American Challenge Cup Mid-Ohio | 23.8.1970 |
| 7 |  |
| Open bodywork |
| Driven by: Peter Gethin (GB) | Result: 9th - did not finish (Camshaft)
Grid: 4th (1:29.7000) |
| Colours: orange (+blue) |
| Tyres: Goodyear |
| Photo updated: 19/10/2020 | Photo by courtesy of: Graham L. Smith |
| | | | | | |
| Can-Am Road America | Road America Can-Am Championship | 30.8.1970 |
| 5 |  |
| Open bodywork |
| Driven by: Denny Hulme (NZ) | Result: did not finish (DQ: illegal push start)
Grid: 1st (2:10.6000) |
| Colours: orange (+blue) |
| Tyres: Goodyear |
| Photo updated: 21/03/2023 | Photo by courtesy of: Paul Thompson |
| | | | | | |
| Can-Am Road Atlanta | | 13.9.1970 |
| 5 |  |
| Open bodywork |
| Driven by: Denny Hulme (NZ) | Result: did not finish (Accident body damage)
Grid: 2nd (1:18.6800) |
| Colours: orange (+blue) |
| Tyres: Goodyear |
| Photo updated: 13/02/2011 | Photo by courtesy of: Jim Hayes |
| | | | | | |
| Can-Am Road Atlanta | | 13.9.1970 |
| 7 |  |
| Open bodywork |
| Driven by: Peter Gethin (GB) | Result: 7th - did not finish (Gearbox)
Grid: 3rd (1:19.6700) |
| Colours: orange (+blue) |
| Tyres: Goodyear |
| Photo updated: 13/02/2011 | Photo by courtesy of: Jim Hayes |
| | | | | | |
| Can-Am Laguna Seca | Monterey Castrol Grand Prix Laguna Seca | 18.10.1970 |
| 5 |  |
| Open bodywork |
| Driven by: Denny Hulme (NZ) | Result: winner
Grid: 1st (1:00.6000) - 2nd fastest qualifier |
| Colours: orange (+blue) |
| Tyres: Goodyear |
| Photo updated: 19/10/2020 | Photo by courtesy of: Graham L. Smith |
| | | | | | |
| Can-Am Laguna Seca | Monterey Castrol Grand Prix Laguna Seca | 18.10.1970 |
| 7 |  |
| Open bodywork |
| Driven by: Peter Gethin (GB) | Result: did not finish (Flat battery)
Grid: 2nd (1:00.6000) - 3rd fastest qualifier |
| Colours: orange (+blue) |
| Tyres: Goodyear |
| Photo updated: 20/03/2023 | Photo by courtesy of: Bob Moffett |
| | | | | | |
| Can-Am Riverside | 13th Annual Los Angeles Times Grand Prix Riverside | 1.11.1970 |
| 5 |  |
| Open bodywork |
| Driven by: Denny Hulme (NZ) | Result: winner
Grid: 2nd (1:34.6900) |
| Colours: orange (+blue) |
| Tyres: Goodyear |
| Photo updated: 22/10/2022 | Photo by courtesy of: SterlingImages.us |
| | | | | | |
| Can-Am Mid-Ohio | Valvoline Can-Am Mid-Ohio | 22.8.1971 |
| 8 |  |
| Open bodywork |
| Driven by: Tony Dean (GB) | Result: did not start (Accident in practice)
Grid: 28th |
| Colours: blue (+yellow) |
| Tyres: unknown |
| Photo updated: 23/03/2023 | Photo by courtesy of: Brian McMahon |
| | | | | | |
| Can-Am Mid-Ohio | Valvoline Can-Am Mid-Ohio | 22.8.1971 |
| 11 |  |
| Open bodywork |
| Driven by: Lothar Motschenbacher (USA) | Result: did not finish (Transmission)
Grid: 5th (1:29.0830) |
| Colours: red (+dark blue) |
| Tyres: Goodyear |
| Photo updated: 20/10/2020 | Photo by courtesy of: Ken Graser |
| | | | | | |
| Can-Am Riverside | 14th Annual Los Angeles Times Grand Prix | 31.10.1971 |
| 2 |  |
| Open bodywork |
| Driven by: George Follmer (USA) | Result: 9th - did not finish (Out of fuel)
Grid: 4th (1:34.1900) |
| Colours: yellow |
| Tyres: Goodyear |
| Photo updated: 09/07/2002 | Photo by courtesy of: Curt Anderson |
| | | | | | |
| Can-Am Mid-Ohio | Canadian American Challenge Cup Mid-Ohio | 6.8.1972 |
| 11 |  |
| Open bodywork |
| Driven by: Lothar Motschenbacher (USA) | Result: did not finish (Water bleed off line/vapor lock)
Grid: 8th (1:29.8030) |
| Colours: red (+dark blue) |
| Tyres: Goodyear |
| Photo updated: 13/02/2011 | Photo by courtesy of: Jim Hayes |
| | | | | | |
| Can-Am Edmonton | Can-Am Challenge Race for the Molson Cup | 1.10.1972 |
| 9 |  |
| Open bodywork |
| Driven by: John Cordts (CDN) | Result: 12th - did not finish (Unknown)
Grid: 12th (1:26.5140) |
| Colours: yellow (+blue) |
| Tyres: Goodyear |
| Photo updated: 02/04/2023 | Photo by courtesy of: Kevin Skinner |
| | | | | | |
| Can-Am Mosport | Labatt's Blue Trophy in the Can-Am Challenge Race | 10.6.1973 |
| 9 |  |
| Open bodywork |
| Driven by: John Cordts (CDN) | Result: 9th - did not finish (Out of fuel)
Grid: 6th (1:19.7000) |
| Colours: yellow (+blue) |
| Tyres: unknown |
| Photo updated: 02/10/2004 | Photo by courtesy of: Alan Fassbender |
| Page 1 of 2 (49 items) | << | < | 1 | 2 | > | >> |
×
RSC website is made possible by displaying online advertisements to our visitors.
Please, turn off or otherwise disable your Ad Blocking software
or
become an RSC Donator and contact us.