Race added to RSC Photo Gallery: 26/08/2012
Last photo update on this page: 12/09/2021
| | | | | | |
| 0 |  |
| Closed bodywork |
| Driven by: "John Winter" (D) | Result: did not start (Engine in practice) - Heat 1: did not start ; Heat 2: did not start
Grid: 17th (no time) |
| Colours: white (+blue) |
| Tyres: Goodyear |
| Photo updated: 31/05/2016 | Photo by courtesy of: Brian Isherwood |
| | | | | | |
| 1 |  |
| Closed bodywork |
| Driven by: Piercarlo Ghinzani (I) | Result: winner - margin: 32s05 - Heat 1: winner - margin: 23s01 ; Heat 2: winner - (194.170 kph) - margin: 8s05
Grid: 2nd (1:11.3400) |
| Colours: white (+blue) |
| Tyres: Goodyear |
| Photo updated: 31/05/2016 | Photo by courtesy of: Brian Isherwood |
| | | | | | |
| 10 |  |
| Closed bodywork |
| Driven by: Wayne Taylor (ZA)/James Weaver (GB) | Result: did not finish (Transmission) - Heat 1: 5th (1 lap behind the winner) ; Heat 2: did not finish (Turbo)
Grid: 4th (1:12.4100) |
| Colours: yellow |
| Tyres: Yokohama |
| Photo updated: 31/05/2016 | Photo by courtesy of: Brian Isherwood |
| | | | | | |
| 14 |  |
| Closed bodywork |
| Driven by: Mauro Baldi (I) | Result: did not finish (Out of fuel) - Heat 1: 4th - did not finish (Out of fuel) ; Heat 2: did not finish (Out of fuel)
Grid: 3rd (1:11.5400) |
| Colours: white (+red/blue) |
| Tyres: Goodyear |
| Photo updated: 31/05/2016 | Photo by courtesy of: Brian Isherwood |
| | | | | | |
| 18 |  |
| Closed bodywork |
| Driven by: /Massimo Sigala (I)/Walter Brun (CH) | Result: 4th (2 laps behind the winner) - Heat 1: 6th (2 laps behind the winner) ; Heat 2: 4th (1m19s97 behind the winner)
Grid: 5th (1:12.6700) |
| Colours: white/red (+gold) |
| Tyres: Michelin |
| Photo updated: 31/05/2016 | Photo by courtesy of: Brian Isherwood |
| | | | | | |
| 19 |  |
| Closed bodywork |
| Driven by: Jochen Mass (D)/Thierry Boutsen (B) | Result: 3rd (47s03 behind the winner) - Heat 1: 3rd (38s98 behind the winner) ; Heat 2: 2nd (8s05 behind the winner)
Grid: 1st (1:11.1700) |
| Colours: white (+red) |
| Tyres: Michelin |
| Photo updated: 31/05/2016 | Photo by courtesy of: Brian Isherwood |
| | | | | | |
| 20 | 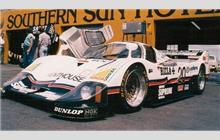 |
| Closed bodywork |
| Driven by: Tim Lee-Davey (GB) | Result: 10th (12 laps behind the winner) - Heat 1: 8th (4 laps behind the winner) ; Heat 2: 12th (8 laps behind the winner)
Grid: 8th (1:18.0900) |
| Colours: white (+black/red) |
| Tyres: Dunlop |
| Photo updated: 31/05/2016 | Photo by courtesy of: Brian Isherwood |
| | | | | | |
| 22 |  |
| Closed bodywork |
| Driven by: Tiff Needell (GB) | Result: 5th (6 laps behind the winner) - Heat 1: 7th (3 laps behind the winner) ; Heat 2: 5th (3 laps behind the winner)
Grid: 7th (1:17.2900) |
| Colours: black (+red/blue) |
| Tyres: Dunlop |
| Photo updated: 12/09/2021 | Photo by courtesy of: Johan 'JayBee' Pretorius and Brian Isherwood |
| | | | | | |
| 33 |  |
| Closed bodywork |
| Driven by: George Fouché (ZA) | Result: did not finish (Engine) - Heat 1: did not finish (Engine) ; Heat 2: did not start
Grid: 6th (1:16.9600) |
| Colours: white (+yellow/red/green/blue/black) |
| Tyres: Goodyear |
| Photo updated: 12/09/2021 | Photo by courtesy of: Brian Isherwood and Johan 'JayBee' Pretorius |
| | | | | | |
| 45 | 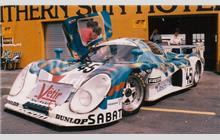 |
| Closed bodywork |
| Driven by: Bruno Sotty (F)/Patrick Oudet (F) | Result: 13th (19 laps behind the winner) - Heat 1: 14th (6 laps behind the winner) ; Heat 2: 14th (13 laps behind the winner)
Grid: 15th (1:25.5800) |
| Colours: white/blue (+red/yellow) |
| Tyres: Dunlop |
| Photo updated: 31/05/2016 | Photo by courtesy of: Brian Isherwood |
| | | | | | |
| 56 |  |
| Closed bodywork |
| Driven by: Jochen Dauer (D) | Result: did not finish (Fuel injection) - Heat 1: did not finish (Fuel injection) ; Heat 2: 6th (3 laps behind the winner)
Grid: 9th (1:21.0800) |
| Colours: white (yellow/red) |
| Tyres: Goodyear |
| Photo updated: 31/05/2016 | Photo by courtesy of: Brian Isherwood |
| | | | | | |
| 63 |  |
| Closed bodywork |
| Driven by: George Santana (ZA)/Ernst Schuster (D) | Result: 6th (7 laps behind the winner) - Heat 1: 9th (4 laps behind the winner) ; Heat 2: 7th (3 laps behind the winner)
Grid: 10th (1:21.2300) |
| Colours: black (+orange/ref) |
| Tyres: Dunlop |
| Photo updated: 12/09/2021 | Photo by courtesy of: Johan 'JayBee' Pretorius |
| | | | | | |
| 72 |  |
| Closed bodywork |
| Driven by: Robin Donovan (GB)/Michael Bryan (ZA) | Result: 12th (15 laps behind the winner) - Heat 1: 16th (6 laps behind the winner) ; Heat 2: 13th (9 laps behind the winner)
Grid: 16th (1:25.5300) |
| Colours: white/black (+blue) |
| Tyres: Avon |
| Photo updated: 31/05/2016 | Photo by courtesy of: Brian Isherwood and Steve Tarrant |
| | | | | | |
| 75 |  |
| Closed bodywork |
| Driven by: Mike Briggs (ZA)/Evan Clements (GB) | Result: 9th (9 laps behind the winner) - Heat 1: 13th (5 laps behind the winner) ; Heat 2: 8th (4 laps behind the winner)
Grid: 19th (no time) |
| Colours: green (+orange/white) |
| Tyres: Avon |
| Photo updated: 26/08/2012 | Photo by courtesy of: Steve Tarrant |
| | | | | | |
| 83 |  |
| Closed bodywork |
Driven by: Luigi Taverna (I)
DNS: Oscar Berselli (I) | Result: did not finish (Accident) - Heat 1: did not finish (Accident) ; Heat 2: did not start
Grid: 11th (1:22.1600) |
| Colours: white |
| Tyres: unknown |
| Photo updated: 31/05/2016 | Photo by courtesy of: Brian Isherwood |
| | | | | | |
| 98 |  |
| Closed bodywork |
| Driven by: Giles Butterfield (GB) | Result: 8th (9 laps behind the winner) - Heat 1: 11th (4 laps behind the winner) ; Heat 2: 10th (5 laps behind the winner)
Grid: 12th (1:22.8000) |
| Colours: white |
| Tyres: Avon |
| Photo updated: 31/05/2016 | Photo by courtesy of: Brian Isherwood |
| | | | | | |
| 99 | 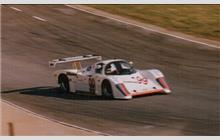 |
| Closed bodywork |
| Driven by: Costas Los (GR) | Result: 11th (12 laps behind the winner) - Heat 1: 15th (6 laps behind the winner) ; Heat 2: 11th (6 laps behind the winner)
Grid: 14th (1:23.5400) |
| Colours: white (+orange) |
| Tyres: unknown |
| Photo updated: 31/05/2016 | Photo by courtesy of: Brian Isherwood |
| | | | | | |
| 105 |  |
| Closed bodywork |
| Driven by: Pasquale Barberio (I)/Maurizio Gellini (I) | Result: 7th 1st in C2 (9 laps behind the winner) - Heat 1: 10th (4 laps behind the winner) ; Heat 2: 9th (5 laps behind the winner)
Grid: 13th (1:23.4000) |
| Colours: white/green |
| Tyres: Avon |
| Photo updated: 31/05/2016 | Photo by courtesy of: Brian Isherwood |
| | | | | | |
| 77 |  |
| Closed bodywork |
| Driven by: Gareth Chapman (GB)/Graham Duxbury (ZA) | Result: did not finish (Electrics) - Heat 1: 12th (5 laps behind the winner) ; Heat 2: did not finish (Electrics)
Grid: 20th (no time) |
| Colours: unknown |
| Tyres: unknown |
If you have a picture of any car that is missing in the gallery or you might have a better photo, please, do not hesitate to
get in touch with us.
×
RSC website is made possible by displaying online advertisements to our visitors.
Please, turn off or otherwise disable your Ad Blocking software
or
become an RSC Donator and contact us.